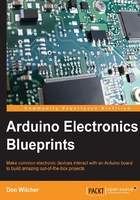
A programmable motor controller block diagram
The block diagram of the programmable DC motor controller with a Liquid Crystal Display (LCD) can be imagined as a remote control box with two slide switches and an LCD, as shown in following diagram:

The Remote Control Box provides the control signals to operate a DC motor. This box is not able to provide the right amount of electrical current to directly operate the DC motor. Therefore, a transistor motor driver circuit is needed. This circuit has sufficient current gain hfe to operate a small DC motor. A typical hfe value of 100 is sufficient for the operation of a DC motor. The Enable slide switch is used to set the remote control box to the ready mode. The Program switch allows the DC motor to be set to an ON or OFF operating condition by using a simple selection sequence. The LCD displays the ON or OFF selection prompts that help you operate the DC motor. The remote control box diagram is shown in the next image.
The idea behind the concept diagram is to illustrate how a simple programmable motor controller can be built by using basic electrical and electronic components. The Arduino is placed inside the remote control box and wired to the Enable/Program switches and the LCD. External wires are attached to the transistor motor driver, DC motor, and Arduino.
As discussed in Chapter 1, A Sound Effects Machine, the block diagram of the programmable motor controller is an engineering tool that is used to convey a complete product design by using simple graphics. The block diagram also allows ease in planning the breadboard to prototype and test the programmable motor controller in a maker workshop or a laboratory bench. A final observation regarding the block diagram of the programmable motor controller is that the basic computer convention of inputs is on the left, the processor is located in the middle, and the outputs are placed on the right-hand side of the design layout. As shown, the SPDT switches are on the left-hand side, Arduino is located in the middle, and the transistor motor driver with the DC Motor is on the right-hand side of the block diagram.
The LCD is shown towards the right of the block diagram because it is an output device. The LCD allows visual selection between the ON/OFF operations of the DC motor by using Program switch. This left-to-right design method allows ease in building the programmable motor controller as well as troubleshooting errors during the testing phase of the project. The block diagram for a programmable motor controller is as follows:

Building the programmable motor controller
The block diagram of the programmable motor controller has more circuits than the block diagram of the sound effects machine that we talked about in Chapter 1, Sound Effects Machine. As discussed previously, there are a variety of ways to build the (prototype) electronic devices. For instance, they can be built on a Printed Circuit Board (PCB) or an experimenter's/prototype board. The construction base that was used to build this device was a solderless breadboard, which is shown in the next image. The placement of the electronic parts, as shown in the image, are not restricted to the solderless breadboard layout. Rather, it should be used as a guideline.
Another method of placing the parts onto the solderless breadboard is to use the block diagram that was shown earlier. This method of arranging the parts that was illustrated in the block diagram allows ease in testing each subcircuit separately. For example, the Program/Enable SPDT switches' subcircuits can be tested by using a DC voltmeter. Placing a DC voltmeter across the Program switch and 1 kilo ohm resistor and toggling switch several times will show a voltage swing between 0 V and +5V. The same testing method can be carried out on the Enable switch as well. The transistor motor driver circuit is tested by placing a +5 V signal on the base of the 2N3904 NPN transistor. When you apply +5 V to the transistor's base, the DC motor turns on. The final test for the programmable DC motor controller is to adjust the contrast control (10 kilo ohm) to see whether the inpidual pixels are visible on the LCD. This electrical testing method, which is used to check the programmable DC motor controller is functioning properly, will minimize the electronic I/O wiring errors. Also, the electrical testing phase ensures that all the I/O circuits of the electronics used in the circuit are working properly, thereby allowing the maker to focus on coding the software. Following is the wiring diagram of programmable DC motor controller with the LCD using a solderless breadboard:

As shown in the wiring diagram, the electrical components that are used to build the programmable DC motor controller with the LCD circuit are placed on the solderless breadboard for ease in wiring the Arduino, LCD, and the DC motor. The transistor shown in the preceding image is a 2N3904 NPN device with a pin-out arrangement consisting of an emitter, a base, and a collector respectively. If the transistor pins are wired incorrectly, the DC motor will not turn on. The LCD module is used as a visual display, which allows operating selection of the DC motor. The program slide switch turns the DC motor ON or OFF. Although most of the 16-pin LCD modules have the same electrical pin-out names, consult the manufacturer's datasheet of the available device in hand. There is also a 10 kilo ohm potentiometer to control the LCD's contrast. On wiring the LCD to the Arduino, supply power to the microcontroller board by using the USB cable that is connected to a desktop PC or a notebook. Adjust the 10 kilo ohm potentiometer until a row of square pixels are visible on the LCD.
The Program slide switch is used to switch between the ON or OFF operating mode of the DC motor, which is shown on the LCD. The 74LS08 Quad AND gate is a 14-pin Integrated Circuit (IC) that is used to enable the DC motor or get the electronic controller ready to operate the DC motor. Therefore, the Program slide switch must be in the ON position for the electronic controller to operate properly. The 1N4001 diode is used to protect the 2N3904 NPN transistor from peak currents that are stored by the DC motor's winding while turning on the DC motor. When the DC motor is turned off, the 1N4001 diode will direct the peak current to flow through the DC motor's windings, thereby suppressing the transient electrical noise and preventing damage to the transistor. Therefore, it's important to include this electronic component into the design, as shown in the wiring diagram, to prevent electrical damage to the transistor. Besides the wiring diagram, the circuit's schematic diagram will aid in building the programmable motor controller device.